In this short tutorial I will describe how to use an Ext JS GridPanel in the WordPress administration panel for displaying data that is retrieved in JSON-format from the WordPress database by using AJAX.
Since Ext JS DataGrids (GridPanels, EditorGridPanels) come with a lot of amazing features and are easy to implement, it might be especially useful to think about them during WordPress plugin development.
Of course, the first thing to do is to setup WordPress. To show the desired functionality, we need a WordPress plugin. Let’s write a simple one called „Ext JS DataGrid Example“. At first we change to wp-content/plugins/ and add a new folder named „ext_js_example„. We place the unzipped Ext JS folder, we name it „ext-2.2.1„, directly inside our new folder and create our plugin by creating a new file „ext_js_example.php“ and inserting:
    <?php
    /*
    Plugin Name: Ext JS DataGrid Example
    ... Further Standard Plugin Information ...
    */

    // Add Demo Page Link to Menu
    function add_datagrid_page() {
        $page = add_menu_page('Ext JS DataGrid',
            'Ext JS DataGrid', 8, __FILE__, 'datagrid_page');
    }
    add_action('admin_menu', 'add_datagrid_page');

    // Display Demo Page
    function datagrid_page() {
        echo '<div class="wrap"><h2>Ext JS DataGrid</h2></div>';
        echo '<div id="ext_js_datagrid"></div>';
    }
Until now, there’s nothing spectacular. After saving this file we can go to „Plugins“ in the WordPress administration panel, where we activate our new plugin. When clicking our brand new „Ext JS DataGrid“ menu entry, we end up on a nearly empty page. Notice, that we have already implemented an empty div „ext_js_datagrid„, into which we will render the GridPanel of Ext JS.
Now, what do we need for our DataGrid? As a start we should setup Ext JS! To use Ext JS only when necessary, we should load its Stylesheets and JavaScripts only when we need them, i.e. when our plugin is loaded. Therefor we modify our add_datagrid_page-function as follows:
    // Add Demo Page Link to Menu
    function add_datagrid_page() {
        $page = add_menu_page('Ext JS DataGrid',
            'Ext JS DataGrid', 8, __FILE__, 'datagrid_page');

        // Add Ext JS Stylesheets when Demo Page is active
        function init_ext_css() {
            wp_enqueue_style('ext-all', WP_PLUGIN_URL.
            '/ext_js_example/ext/resources/css/ext-all.css');
            }
        add_action('admin_print_styles-'.$page, 'init_ext_css');

        // Add Ext JS when Panel is active
        function init_ext_js() {
            wp_enqueue_script('ext-jquery-adapter', WP_PLUGIN_URL.
                '/ext_js_example/lib/ext/adapter/jquery/'.
                'ext-jquery-adapter.js',
                array('jquery'));
            wp_enqueue_script('ext-all', WP_PLUGIN_URL.
                '/ext_js_example/lib/ext/ext-all.js', array('jquery'));
        }
        add_action('admin_print_scripts-'.$page, 'init_ext_js');
        // Show Ext JS DataGrid
        function show_datagrid() {
            include_once(dirname(__FILE__).'/datagrid.html');
        }
        add_action('admin_head-'.$page, 'show_datagrid');
    }
    add_action('admin_menu', 'add_datagrid_page');
It is absolute necessary to use wp_enqueue_style and wp_enqueue_script instead of simply adding the Ext JS stuff to the header. Only when using these functions it can be made sure that dependencies, such as the above mentioned jQuery, are handled correctly (further information about loading JavaScripts into WordPress plugins can be found on planetozh). The show_datagrid-function adds our specific Ext JS script (the GridPanel) to the body of our page. For the sake of clarity we place the JavaScript code in another file „datagrid.inc„:
<script type='text/javascript'>
Ext.onReady(function() {
var store = new Ext.data.Store({
url: '<?php bloginfo('wpurl'); ?>/wp-admin/
admin-ajax.php?action=ext_js_comments',
reader: new Ext.data.JsonReader({
root: 'rows',
}, [
{name: 'comment_date', type: 'date',
dateFormat: 'Y-m-d H:i:s'},
'comment_author',
'comment_content'
])
});
store.load();
var comments = new Ext.grid.GridPanel({
renderTo: 'ext_js_datagrid',
title: 'All Comments',
width: '99%',
height: 300,
store: store,
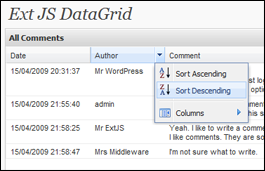
columns: [
{header: "Date", dataIndex: 'comment_date',
width: 120, sortable: true, renderer:
Ext.util.Format.dateRenderer('d/m/Y H:i:s')},
{header: "Author", dataIndex: 'comment_author',
width: 160, sortable: true},
{header: "Comment", dataIndex: 'comment_content',
width: 400, sortable: true}
]
});
});
</script>The Ext.data.Store receives its data (in JSON-format) from /wp-admin/admin-ajax.php, which is WordPress central function for AJAX communication. WordPress delegated the AJAX request to a ext_js_comments-function (we have specified this above in the Ext.data.Store’s URL), thus we have to create that function (at the end of our „ext_js_example.php„):
    // Get comments via AJAX
    function ext_js_comments() {
        global $wpdb;
        $sql = "SELECT * FROM ".$wpdb->comments;
        if(!$rs = $wpdb->get_results($sql)) {
            echo '{success:false}';
        } else {
            echo '{success:true, rows:'.json_encode($rs).'}';
        }
        die;
    }
    add_action('wp_ajax_ext_js_comments', 'ext_js_comments');
And that’s it! Now we’ve got all our comments in an Ext JS GridPanel:
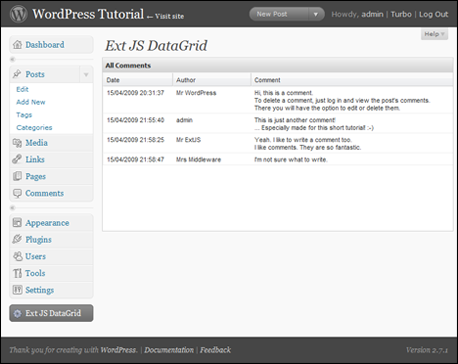
If you have any questions or suggestions for improvement, please leave a comment!
WordPress 2.7.1 and Ext JS 2.2.1 have been used in this tutorial.